


After the scan sales lines have been imported, a number of modifications can be implemented. You can also add articles or delete them, or add a packing to the scan sales order.
 Modifying scanned sales lines
After importing a scan batch (or scanning using a keyboard scanner), the scanned articles are placed in the list area. Depending on the setting that has been defined for allocation, this sales line can be automatically allocated on the stock batch that has the corresponding barcode. If the EAN codes are used – again depending on the setting that has been defined for allocation – allocation can be done on the stock batch with the article that is linked to the barcode. If there are multiple stock batches of the article, allocation takes place according to the allocation priority. If the allocation priority is identical for all stock batches, allocation will take place randomly. Depending on the setting of the allocation, a pop-up may be displayed if allocation has not been completed, to allocate the remaining items.
The scanned sales lines can also be altered. Select the sales line that has to be altered.
 Adding a scan sales line
Sales lines can also be added to a scan sales order.
If a keyboard scanner is linked to the system, it can be used to scan an article, which is then added to the scan sales order. Another option is to manually enter the barcode of the article in the window. Click with your cursor on the 'Scan' input field; this field will now turn green and you can enter the number of the article. Click on <Tab>. The article will be added to the scan sales order.
The third option is via [Add]. Use this option if you don't know the barcode number of the sold article.
Click on [Add]. The order entry window for sales orders will now open. On the left-hand part of the window, the cursor is positioned in the 'Plant name' input field. Enter the desired match code of the plant that is about to be sold. Click on <Tab>. In the bottom right-hand corner of the window, all the stock item lines of the match code that was entered will be displayed. From this list, select the article that is about to be sold. On the left-hand part of the window, the plant name will now be filled and the cursor will be positioned in the 'Quantity' input field.
If there is only one stock item line of the match code that has been entered, this line will be selected automatically. The cursor will then go directly to the 'Quantity' input field. After entering the quantity, click on <Tab> to enable you to modify the price. Click on [OK] when all the data has been entered. The allocation is done in the same way as described above for reading scanned sales lines.
If multiple articles need to be added to the scan sales order, click on [New] in the order entry window after entering the first added item. The entered article will appear in the scan sales order and the cursor will be positioned in the 'Plant name' input field.
A new article can now be added to the scan sales order. In this way, multiple articles can be added to the scan sales order. When the final article has been added, click on [OK].
The Scan sales window is displayed again with the added articles in the list area.
Finalising the scan sales order
After the scan sales lines have been modified or added, the scan sales order can be finalised, if required.
The finalising of the scan sales order is dependent on the sort of customer that the articles have been sold to.
Once all the articles are correctly entered in the scan sales order, the scan sales order can be finalised. The finalisation can be done using the following buttons:
[Payment]: After clicking on this button, a window will be displayed in which you can enter the payment method and the amount per settlement. This will only be available if 1 or more lines are active.
The method of payment is defined in the Basic information of WinTree Nursery Manager.
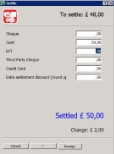


If the amount of money handed over is higher than the amount to be paid, the amount of change that must be given is displayed. A cash receipt can only be printed if the amount entered is greater than or equal to the amount to be paid.
If the payment is in order, the invoice, in the form of a cash receipt, will be printed.
The window is now ready to make the next scan sales order. The selected customer remains the Cash Sales customer.
After settling with the Cash Sales customer, the invoice data is directly stored in the statistics. Note that a cash receipt of the standard Cash Sales customer cannot be printed more than once. Neither can the returns from this customer be finalised via the normal return process. For returns, a manual invoice (or scanning a negative sales line) will have to be made and the stock must be manually updated.
If there is a link to a financial package, the cash receipts are not transferred as sales invoices.
[Delivery note]: A delivery note cannot be printed for the Cash Sales customer.
[Park]: With this button, the scan sales order can be put aside, or parked. A new scan sales order can be imported and processed, after which the parked scan sales order can be retrieved and finalised via [Search].
When finalising a scan sales order for standard business customers, more options are available than for the standard Cash Sales customer.
[Next customer] or [Park]: With this button, the scan sales order will be placed in the 'standard' sales orders list available in WinTree Nursery Manager. The whole order can then be delivered and invoiced via a delivery in Nursery Manager.
Using the [Search order] button, you can call up this order again and finalise it via the scan screen.
The Scan sales window is immediately ready to import the next scan sales order. The selected customer is again the standard Cash Sales customer.
[Invoice]: Using this button, a 'normal' invoice can be printed. The scan sales order is directly processed in the statistics. This invoice can be printed again and also be credited via Returns. If there is a link to a financial package, the invoices are transferred as sales invoices. When printing the invoice, the standard print settings are used.
The Scan sales window is immediately ready to import the next scan sales order. The selected customer is again the standard Cash Sales customer.
[Delivery note]: Using this button, a delivery note can be printed. When printing the delivery note, the standard print settings are used. Depending on the defined settings, the delivery is directly confirmed and/or invoiced. If the delivery is directly invoiced, the invoice need to be printed via File -> Print -> Invoices.
After the scan sales order has been processed, the screen is immediately ready to import the next scan sales order.
Using packing
Depending on the defined settings, packing can also be added to a scan sales order. The packing lines appear in the same frame as the plant lines.
When articles are scanned, barcodes for packing can also be scanned at the same time. If the scan batch is imported, the scanned packing will be added to the bottom of the plant lines. In addition to scanning the packing directly, packing can also be added to the imported scan sales order.
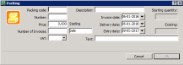
After importing the scan batch, the barcode of the packing type to be added is entered in the 'Scan' input field. To enter a larger number, the same method can be used as for the keyboard scanner.
Using [Packing], it is possible for packing to be added to the scan sales order. The packing codes should be present in WinTree Nursery Manager. These lines are added to the scan order and also maintained in the packing administration.
The extra text that can be added is visible in the packing administration.
Using [Delete], packing can be removed just as you would remove a normal plant line. Returned packing can be added by entering a negative amount. The amount can be modified easily by clicking on the amount in the 'Number' field, and modifying it. The price of the packing can also be modified in the same way.
General information
The Scan sales window also contains delivery and payment conditions. These conditions are derived from the contact information of the selected customer and are passed on in the same way as they are passed on in a normal sales order. Using the [Delivery] button, this information for this order can be modified.
Selecting a customer enables you to view the status of that customer's credit balance. If a customer's credit limit has been exceeded, a warning message will be displayed in the top right-hand corner of the window. When this message is displayed depends on the value that has been defined in parameter 323. Additionally, parameter 354 must be set to 2 to be able to establish the credit limit when scanning.
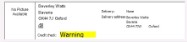
The following values may be seen in the Credit check field:
| OK | Means that the customer is within their credit limit and there are no payment problems. |
| Warning | The limit has been exceeded but it is still possible to buy on credit. |
| Warning + Some of the lines that have been scanned are coloured red. | The customer has exceeded the limit and the lines in red must be paid in cash, other lines can be paid on credit. |
Using the [Discount] button gives you the option to assign a discount for only the line that is active, or to apply the discount to all lines. You will need to activate the checkbox to enable this. You can also simply change the price to another price. The discount will then be specified as a fixed amount. This will then apply to the selected line.

When you enter a percentage, the prices of the scan sales lines – and therefore the total amount of the invoice – will be modified. The discount can be given to both the standard Cash Sales customer and standard business customers.
For a description of all the buttons that can be used, Modifying the C&C window.